Here's a little article with some tips for building the lovely Brasserie from Charlie Foxtrot Models. I've already posted a few articles about building CFM kits (here, here, here and here) so I'll try not to repeat myself! I'll start with a pic of the nearly finished article.
Here's the kit.

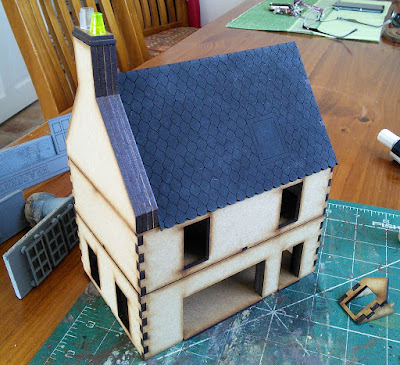
Like the other buildings it's mainly a series of boxes which are easy to build, but a couple of things worth pointing out are the order of the pieces for the front doors and how the roof chimney components look. (Colin does include diagrams with his kit but I thought you might like to see it 'for real'). Don't glue the pieces with doors or panelling yet (the top and bottom pieces in the following pic) as these are easier to paint first then attach later!

In this pic the final end piece for the gable/chimney has yet to be attached, so you can see how it all goes together. Also I spray the roof sections black or dark grey before assembly.

To make it easier to paint the doors and window frames etc, I've got some home-made mounts built from corks on to which I've screwed a length of MDF. Some tiny dots of blu-tak hold the pieces in place. They'll be under-coated in grey primer.

So here's the building assembled. I use pieces of Lego for the chimney pots as it's easier than trimming up the plastic pipe supplied with the kit ;o)
A couple of good layers of gritty masonry paint gives the MDF some texture. Just make sure you keep it away from the door and window frames.

With dormers I've found it easier to texture them before attaching to the roof otherwise I just get masonry paint all over the roof. Glue the dormer to the roof then attach the two small roof sections; this gives a neater join.

As with other buildings I've used some tester pots from the DIY store to get the colours for the walls. Far cheaper than VMC or Foundry! For a creamy white finish start with a beige/biscuit colour then apply some lighter cream/magnolia colours. Finish off with a little pure white. (I did take some pics but the flash obliterated any useful detail). Also, I try to get a slightly uneven coverage as real buildings are rarely completely uniform in colour.
I decided to paint the door, windows, etc in red. I started with a base of Foundry Scarlet shade 38A, then highlights of British Red Coat shade 68A and mid 68B. For a deeper finish you could start with a base of deep red/brown such as Conker Brown Shade 54A and leave off the final highlight. Again I tried to get a slightly uneven coverage to give the finish more depth.

On the front section I painted one panel in black to be a black board, then I picked out the lettering in VMC Dark Sand followed by a faint highlight with pure white.

Here's the (almost) completed Brasserie!

I've described how to paint roofs before so will skip that. The chimney pots are simply painted Foundry Brick Red shade (the closest I have to terracotta) and highlighted with some greys to make them look 'used'. With a fine brush and some white paint I put "Menu" and some scribbles on the black board.
It's not quite properly finished yet though... I intend to add some shutters plus a couple of advertising signs and posters such as "Cinzano". (See the first pic) Pinterest has some great posters! The roof also needs bird droppings, lichen and moss.
In part two I'll look at creating a "tile" on to which the building will be placed so that it can have an area for those naughty Germans to enjoy a coffee outdoors, a backyard, outbuildings, etc. Here's a sneaky-peak of the sort of thing I'm considering.

Maybe I'm taking this scenery thing a little too far? ;o)
 |
| Bonjour! |
Here's the kit.

Like the other buildings it's mainly a series of boxes which are easy to build, but a couple of things worth pointing out are the order of the pieces for the front doors and how the roof chimney components look. (Colin does include diagrams with his kit but I thought you might like to see it 'for real'). Don't glue the pieces with doors or panelling yet (the top and bottom pieces in the following pic) as these are easier to paint first then attach later!

In this pic the final end piece for the gable/chimney has yet to be attached, so you can see how it all goes together. Also I spray the roof sections black or dark grey before assembly.

To make it easier to paint the doors and window frames etc, I've got some home-made mounts built from corks on to which I've screwed a length of MDF. Some tiny dots of blu-tak hold the pieces in place. They'll be under-coated in grey primer.

So here's the building assembled. I use pieces of Lego for the chimney pots as it's easier than trimming up the plastic pipe supplied with the kit ;o)

A couple of good layers of gritty masonry paint gives the MDF some texture. Just make sure you keep it away from the door and window frames.

With dormers I've found it easier to texture them before attaching to the roof otherwise I just get masonry paint all over the roof. Glue the dormer to the roof then attach the two small roof sections; this gives a neater join.

As with other buildings I've used some tester pots from the DIY store to get the colours for the walls. Far cheaper than VMC or Foundry! For a creamy white finish start with a beige/biscuit colour then apply some lighter cream/magnolia colours. Finish off with a little pure white. (I did take some pics but the flash obliterated any useful detail). Also, I try to get a slightly uneven coverage as real buildings are rarely completely uniform in colour.
I decided to paint the door, windows, etc in red. I started with a base of Foundry Scarlet shade 38A, then highlights of British Red Coat shade 68A and mid 68B. For a deeper finish you could start with a base of deep red/brown such as Conker Brown Shade 54A and leave off the final highlight. Again I tried to get a slightly uneven coverage to give the finish more depth.

On the front section I painted one panel in black to be a black board, then I picked out the lettering in VMC Dark Sand followed by a faint highlight with pure white.

Here's the (almost) completed Brasserie!

I've described how to paint roofs before so will skip that. The chimney pots are simply painted Foundry Brick Red shade (the closest I have to terracotta) and highlighted with some greys to make them look 'used'. With a fine brush and some white paint I put "Menu" and some scribbles on the black board.
It's not quite properly finished yet though... I intend to add some shutters plus a couple of advertising signs and posters such as "Cinzano". (See the first pic) Pinterest has some great posters! The roof also needs bird droppings, lichen and moss.
In part two I'll look at creating a "tile" on to which the building will be placed so that it can have an area for those naughty Germans to enjoy a coffee outdoors, a backyard, outbuildings, etc. Here's a sneaky-peak of the sort of thing I'm considering.

Maybe I'm taking this scenery thing a little too far? ;o)
Comments
Post a Comment