This piece was commissioned by a good friend. It uses the Debris of War graveyard kit with a few extra gravestones. The bases were custom cut by Charlie Foxtrot Models. Models are Front Rank and painted by me.
Thought I'd do a "sort of" step-by-step of how I went about it...
I started by base-coating a few gravestones then decided that it might be interesting to just arrange the pieces to see how it might look. This proved to be a good idea as it was clear a few more gravestones would be needed!
The walls and gravestones were painted in the same layered style as for the Charlie Foxtrot Church and Grainstore I did some time back. An additional step here was using a whole bottle of Agrax Earthshade to really bring out the lovely texture in these resin items.
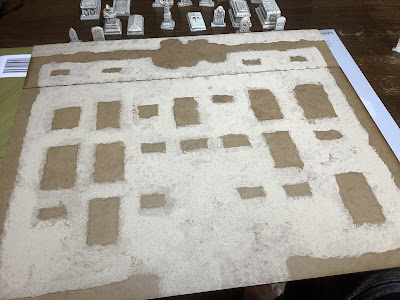
With all the resin components painted it was time to lay it all out again just to be doubly sure it fits, looks good, etc. Then I drew around each item so that I'd know where to apply ground texture. I also used this pic to recall where I'd put each piece!
Next comes the ground texture. First is a couple of layers of masonry paint. I wanted the ground to have a mix of textures, i.e. masonry paint, sand and grit, mix of both, etc.
Next, glue the resin in place. Good PVA wood glue (Bostik) was ideal for this as it allows some 'adjustment' before it sets.
The smaller board section had a slight positive curve (higher in the middle than the edges) so to overcome this I glued the walls and rubble in place then used a couple of clamps to keep it all straight whilst the glue set.
You might have noticed that the gates do not quite fully cover the gap. This is quite intentional as the gap is then just wide enough for an 8-man group of figures to fit through.
This is most likely to be used with the splendid Too Fat Lardies rules, Sharp Practice 2, and a great many of the forces organise the bulk of their troops in to groups of 8 figures.
Basecoat was Americana Honey Brown, followed by highlights of Americana Fawn (the larger piece is at this point), then VMC Dark Sand (the smaller piece has this highlight) and finally Foundry Boneyard Light. I then choose some small areas and gave them a thinned wash of Agrax Earthshade to bring out enhance the details, then re-applied the VMC and Foundry highlights.
Next it's time to apply static grass (Colonel Bill's Winter Grass) and lots of clump foliage, tufts, etc.
Finally, the railings were given a quick spray of black and highlighted with a little GW Tin Bitz and a very light highlight of grey. They're held in here using blu-tak as they'll be glued in properly post delivery.
I hope you found that interesting/useful. Thanks for looking.


Comments
Post a Comment